9 Ways to Fix “Network Discovery Is Turned off” in Windows 10
Are you facing the “Network Discovery is turned off” issue while searching for other devices on a network from your Windows PC? It’s a common issue for Windows 10 and affects Windows 11 users as well. If you’re one of them, you’re in the right place. Today, we’ve put together a step-by-step guide on how to fix Network Discovery is turned off in Windows 10. Continue reading to explore the issue and solutions as well
What is Network Discovery?
Network Discovery is a feature included in Windows 10 that allows its users to find other devices connected to the network with this feature turned on. It is utilized to share folders and files among various devices on the network. It is also possible to share printers that are locally attached to complete errands for other computers connected to the network.
If this feature is enabled, it will make the IP address and other details public to the network. Therefore, anyone on the same network can access the folders and files on your computer. However, the permissions to each folder and file on the computer are modified separately by using the permissions settings inside the properties.
Users have reported that this method can be the most user-friendly for sharing information via an identical network. Users do not need to send an email attachment every time they wish to share something with colleagues.
Why is Network Discovery Turned Off?
When you disabled the Windows Network Discovery accidentally or reset the settings, that might have caused the error of Network Discovery is Turned Off and won’t turn on. Have a look at the other reasons:
- When your computer has an outdated Network adapter.
- If your Network Discovery is blocked by Windows Firewall, then it shows the error.
- When your network profile is not set appropriately, whether it is Public or Private.
- Resetting the network settings causes Network Discovery turned off error.
How to Fix Network Discovery is Turned Off Error in Windows 10
We’ve provided nine effective solutions to solve this issue and each of these solutions is applicable to Windows 10. It is possible to expand the table below and switch to the appropriate solution easily.
Method 1: Choose the right Sharing Mode
Windows has two different network profiles: private and public. It is important to make sure you are aware of two issues connected to these profiles. First, allow network sharing for private profiles only. And then, be sure to switch the current network to a private profile.
Sometimes the private sharing feature is turned on while you’re using your public profile. This causes issues. This is why you must know what to do.
Method 2: Restart the computer
Certain services are prone to fail and require restarting. Rebooting your computer will give an initial start for the programs and the functions involved. So, the first method to resolve the issue is to perform a system restart and then check to see whether the issue is solved.
Method 3: Enable Network Discovery
When you face the “Network Discovery is turned off” error, you can easily solve it by enabling Network Discovery. Let’s follow the process:
Step 1: Press Win+I to open the Settings option.
Step 2: Click Network & Internet > Status.
Step 3: On the right side, click Network and Sharing Center and select Change Advanced Sharing Settings.
Step 4: Click on the Private and choose Turn on Network Discovery and tick mark on Turn on Automatic Setup of Network Connected Devices.
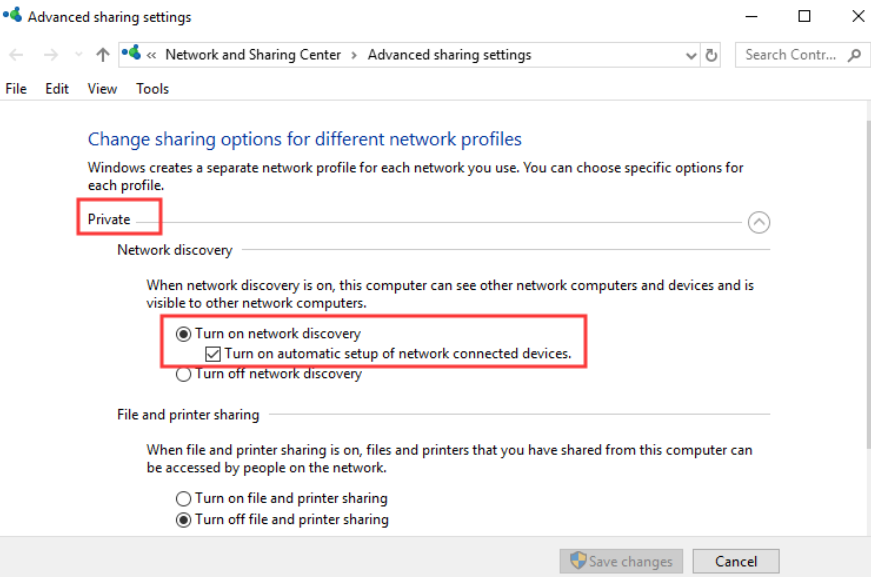
Step 5: Tap the Save Changes, and you have enabled Network Discovery.
Method 4: Manage Windows Services
If the method above didn’t solve the issue of network discovery being turned off in Windows 10 or 11 PC, then follow these steps for an alternative solution.
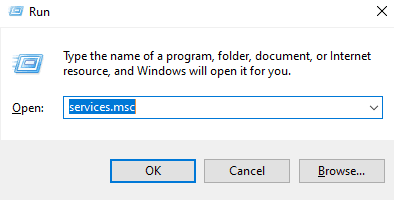
- Use the Windows keyboard shortcut “Win + R” to open the Run window. Enter services.msc and press Enter.
- Scroll down to search for ” Function Discovery Resource Publication“. Double-click the link and modify ”Startup type” to “Automatic” “Startup type” to “Automatic“. Then, click “Start” under “Service status” and then click “OK“.

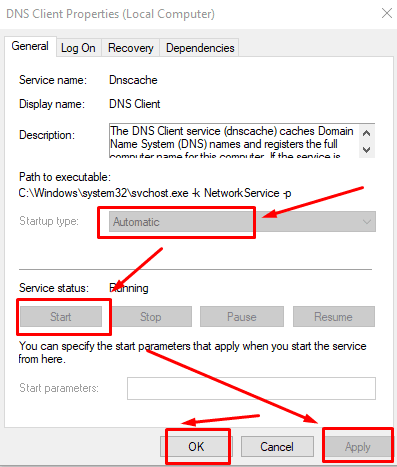
- Next, search for the “DNS Client Properties” service and ensure that the setting is set to “Automatic” and “Automatic. Also, make sure that the service is on.
- In the end, you should look for “SSDP Discovery ” and then click on it. Switch your preference to “Automatic” from the drop-down menu and launch the service.
- Now, restart your PC to fix the issue and check if the “Network Discovery is turned off” error is fixed in your Windows 10/11 laptop or computer.
Method 5: Disable Antivirus and Firewall
A lot of times, your antivirus could be accountable for interruptions that lead to the problem that network detection isn’t being turned on. Try updating it first. If the issue persists then temporarily disable it to see if this is the cause.
If you are using other firewall programs, try disabling them to pinpoint the source of the problem. Once you have disabled it, restart the PC to see if the issue has gone away.
Method 6: Reset the Networking Settings by Command
Another option to correct the issue, provided that the configuration is correct it is to reset the stack of network adapters. Setting the stack entails swiftly removing and installing the network adapters and eliminating all cached configurations. Before proceeding you should backup any configuration on the network since all settings have been reset back to their default configurations.
Launch Command Prompt by typing command into Run.
Input the following commands one after one and in the exact sequence:
- Ipconfig/release
- ipconfig /flushdns
- ipconfig /renew
- netsh int ip reset
- netsh resets winsock
Method 7: Update Network Adapter
A faulty or outdated network adapter can also cause problems with features that are related to networks, like network sharing. It is therefore important to keep it up-to-date. Follow these steps:

Step 1. Click on Start Menu, right-click, then select Device Manager from there.

Step 2. Click on the small button below Network Adapters. Right-click on the network adapter and choose the update driver in the drop-down menu. Select automatically in the pop-up window, and then follow the instructions on the screen to finish the process.
Method 8: Run troubleshooting
Microsoft includes an inbuilt troubleshooter recognized for its ability to resolve many problems. It is recommended to try it out to resolve the issue. To fix this issue take these steps:
Step 1: Open Windows Settings and go to Update & Security.

Step 2: Click Troubleshoot on the right sidebar. On the right, select Network Adapter and hit the Run Troubleshooter button. Follow the instructions displayed on the screen to finish the procedure. After that, click Shared Folders and run its troubleshooter.
Method 9: Reset Network Settings
If nothing works, you should reset your network settings. Resetting your network will not erase the data stored on your computer, however, it will restore all network-related settings to their original settings.
To reset your network to a previous state, follow these steps:
Step 1: Open Settings and go to Network and Internet.

Step 2. Select Status from the right side. Scroll to the bottom and select Network Reset. Make sure to confirm on the next screen.
Step 3. Restart your computer.
Final Words
We hope the previous methods resolved your Windows device’s network discovery is turning on. While the problem has been resolved, Network Discovery is turned off automatically when it is not in use. Because leaving network sharing turned on affects firewall settings, putting your PC at risk of being hacked. So, don’t do that.
Leave your thoughts in the comment section about this article, and ask questions (if any), and we will reply to you with a solution. Bookmark Msckey to receive all the latest updates, offers, and promotions about software.
FAQs
Q1: Is it good to turn on network discovery?
Network Discovery enables users to share network resources with their preferred systems. We discourage you from keeping Discovery Network on all the time, because attackers can easily find the resources you’re sharing.
Q2: How to turn off the Discovery Network?
Follow these processes: Settings > Network & Internet > Status > Network and Sharing Center > Advanced Sharing Settings > Guest or Public (Current profile) > Network Discovery (Turn off Network Discovery).


