7 Important tips for Windows 10 Sleep Settings

Idle mode in Windows saves energy and battery life by putting the machine into sleep mode. In Windows 10 Sleep Settings Mode, the computer suspends all activity and saves the current state. When you return to manage the system, it resumes its previous state. We’ll show you how to alter the sleep settings in Windows 10 in this post.
What is the computer’s windows 10 Sleep setting?
It’s a power-saving mode that disables the majority of your computer’s functions when it’s idle. Any open files or applications are relocated to the system memory (RAM), resulting in a low-power system. It is the preferable method because it is faster than restarting the machine.
How does Windows 10’s Sleep Mode work?
If you haven’t noticed, after a few minutes of inactivity, your monitor shuts off. That isn’t Sleep Mode at all. Because the display consumes a lot of electricity, the first thing Windows does is turn it off. It’s perfect for circumstances where you’ll need to use your computer in a matter of minutes.
The state of the computer is saved on the RAM in Sleep Mode, also known as Standby or Suspended Mode. It appears to have been turned off. While you may hear fans operating at a low pace, this simply indicates that the computer is still on and ready for input from the mouse or keyboard.
There are 7 important tips for Windows 10 Sleep Settings that you should be aware of.
1. Changing the time of your sleep in Windows 10

The instructions below will allow you to change your Windows sleep settings:
- Press the Windows Key + Q shortcut to bring up the search box.
- Select “Choose when the PC sleeps” after typing “sleep.”
- Using the drop-down menus, set the time for both.
If you’re using a laptop, you have four options, two of which are for when you’re on battery power and the other for when you’re connected in. When the PC’s battery is running low, the former will take effect, while the latter will affect times when you’re plugged into an outlet. These should be changed to make the most of the power available.
2. Select the Idle Time After Which Your Computer Sleeps
The first choice to choose when configuring sleep settings for your PC is how long your PC should be in idle mode before entering sleep mode. When your machine is plugged in to a power source and when it is running on batteries, you have a variety of alternatives.
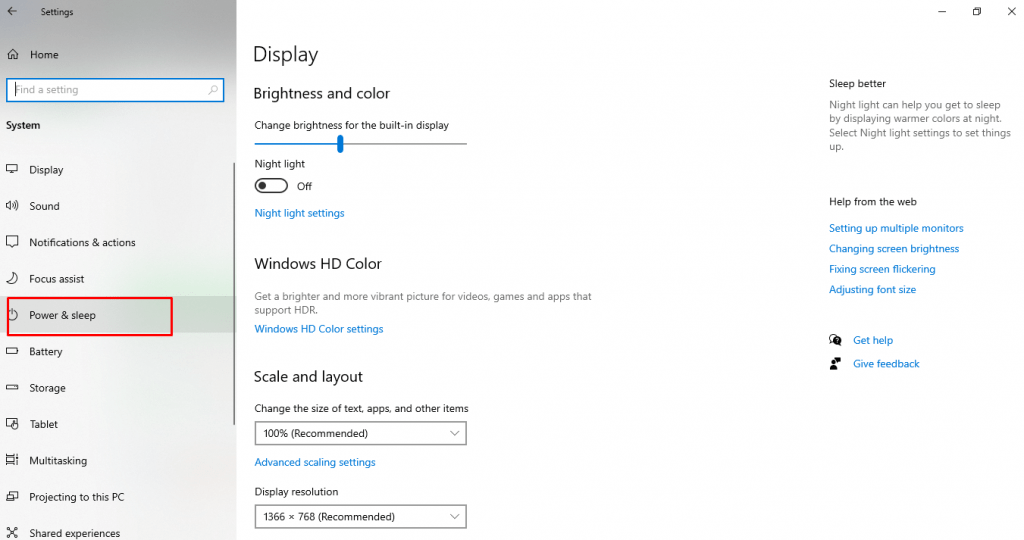
- Press the Windows + I keys at the same time to open the Settings app on your PC.
- On the Settings page, go to System.
- Select Power & Sleep from the left-hand sidebar.
- In the Sleep area on the right, specify when your computer goes to sleep. Depending on when your PC should enter sleep mode, choose an option from both drop-down menus.
Choose Never from both drop-down choices if you don’t want your PC to go into sleep mode. Your computer will never go to sleep this manner and will always be awake.
3. Disable the Hybrid Sleep Setting to Avoid Problems
In Windows 10, hybrid sleep is a blend of sleep and hibernation modes. This combination can cause a variety of problems on your computer. It’s important turning off this option on your computer to avoid this from happening.

- Go to your computer’s Control Panel. The simplest way to do this is to enter the Start menu, type Control Panel into the search box, and select that option from the results.
- In the Control Panel box, select Hardware and Sound.
- On the next page, select Power Options.
- Locate your active power plan and click the Change plan settings link next to it.
- Select Advanced power parameters can be changed.
- In the Power Options box, expand the Sleep option.
- Expand Allow hybrid sleep and turn both the On battery and Plugged in choices off.
- At the bottom of the window, select Apply, then OK.
4. Reboot your computer in safe mode.
Problems with sleep mode are frequently caused by a conflict between the hardware and software at startup. To see if this is the case, reboot your computer in Windows 10 Safe Mode and see if it can sleep. If it can, you’ll need to conduct a clean boot to isolate the problem.
Choose Run by pressing the Windows key + X. Then, to open System Configuration, type msconfig. After that, go to the Services panel, check Hide all Microsoft services, and disable everything. This will ensure that just the most important services are available.
Open Task Manager and disable any apps that are set to launch at startup. Both System Configuration and Task Manager should be closed. Restart your computer. If your computer can go into sleep mode, it suggests a program or process is causing the issue.
5. Use the Power Troubleshooter to troubleshoot the problem.
There’s a good possibility you’ve altered and customized your power plan settings for a variety of jobs in the past. Unfortunately, these adjustments can sometimes cause sleep issues.

The power troubleshooter corrects sleep-related issues by resetting the settings and providing instructions on how to avoid them in the future.
Click Troubleshoot under Settings > Update & Security. Then select Additional Troubleshooter from the drop-down menu. Finally, scroll to the bottom of the page and choose Power to open the Power troubleshooter.
You can view extensive information about all potential concerns and their solutions once the procedure is completed.
6. Make a Power Schedule Using Custom Sleep Settings
You can take the options from an existing plan, change them to fit your needs, and create your own personalized plan.
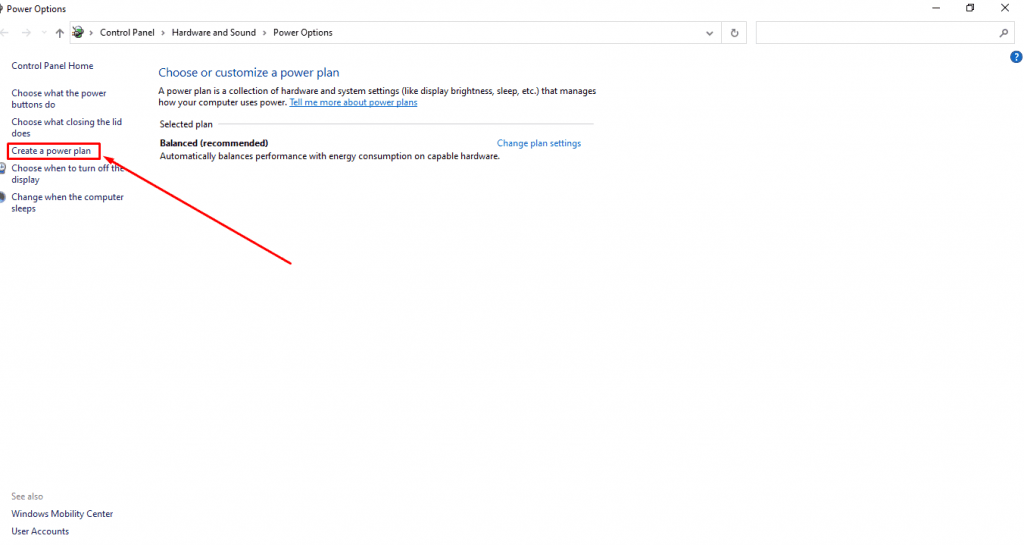
- Select Power Options from the Start menu by right-clicking it.
- Choose From the options in the left sidebar, create a power plan.
- From the right sidebar, select Additional power settings.
- Choose an existing plan to replicate settings from, give your new power plan a name, and then click Next.
- Select Create after specifying the display off and sleep settings.
- Your freshly made power plan will now appear on your screen. This is the default power plan for your PC, and it is presently in use.
- Select Adjust plan settings > Change advanced power settings to change your power plan’s advanced options.
7. Verify the Attached Devices’ Compatibility
It’s possible that a device connected to your PC isn’t compatible with the most recent version of Windows 10. This is due to the fact that certain manufacturers deliver upgrades before the latest version of Windows is available. Printers, scanners, game consoles, webcams, and other devices are common causes.
Check the manufacturer’s website for any concerns with compatibility. Whether there aren’t any, unplug the device and see if the difficulty with sleep continues.
Is it a terrible idea to put the laptop to sleep for the night?
Not at all! It’s especially beneficial when you’re using an unplugged laptop and want to keep your computer operating as long as feasible. When most Windows computers are inactive, the default Sleep setting is set to two hours. You can, however, change your mind at any moment.


