How to Create a Full Windows 10 Backup

Windows 10 is a fantastic operating system with numerous security features and protections. However, with any technological gadget, we can’t rule out the chance of a system breakdown. There could be hardware or software flaws that entirely disable the system. Taking a backup is always a good idea in these situations, and it’s even more important now that Windows has a history of system failures and BSOD issues. While restarting Windows 10 can address some of these issues, you risk losing your data in most circumstances. To avoid such unanticipated failures, we should create a Windows 10 backup and save it to a secondary memory device, such as an external hard disk. We conducted extensive research for this article and discovered some excellent native and third-party programs for creating Windows 10 backups. Let’s get started with the guide without further ado.
Creating Backup of Windows 10 Devices in 2022
In this post, we’ll go over both native and third-party options for backing up your Windows 10 computers so that you don’t lose your data.
Using a Native Method
Microsoft provides three options for backing up Windows 10. File History is the simplest way, since it allows you to back up your key files to a different memory device. The second option is to build a full system image, which will aid in the recovery of your PC in the event of hardware failure or OS damage. The third option is to use OneDrive to back up your files to the cloud. So, now that we’ve covered the basics of the various strategies, let’s get into more detail about each one.
Using File History to Back Up Windows 10
We can build exact duplicates of disks and save them on a separate memory device using the File History function. Keep in mind that this procedure just backs up your files, not your operating system. Proceed to the following stage if you want to create a complete Windows 10 backup, including system files. You’ll also need an extra memory storage device to keep the backup. The backup might be stored on a portable hard disk or a pen drive.
1. Connect your external storage device first. Press the “Windows” and “I” keys at the same time to launch Windows Settings. Open “Update and Security” from this menu.
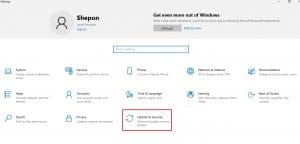
2. Then, in the left pane, select the “Backup” tab. Click the “Add a drive” option under “Backup using File History.”
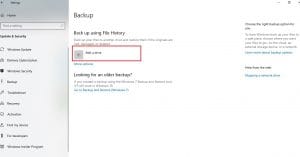
- The detachable memory storage device is located here. Simply click it, and your files will be automatically backed up.
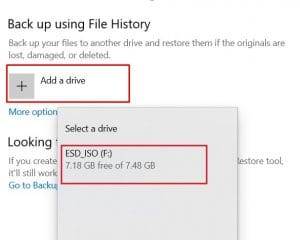
4. On the next page, you may adjust various parameters such as which folders to back up and how often backups are performed.
Create a full backup of Windows 10 with Backup and Restore.
The Backup and Restore function in Windows 10 allows you to create a full backup. It allows you to make an exact replica of your hard drive, complete with the operating system. In the event of future hardware or operating system failures, the whole system image can be used to restore your PC to a working state while keeping all of your personal files intact. Backup and Restore was first published with Windows 7, however it is no longer being actively developed. Without any dramatic modifications, Windows 10 includes the same capability. Now that we’ve covered everything, let’s get started with the steps.
1. Open Control Panel and go to System and Security > Backup and Restore (Windows 7) > “Backup and Restore (Windows 7)”.

2. Select “Create a System Image” from the drop-down menu.

3. Now click the “Next” button and select the drive where you wish to save the whole system image. It’s best if you save it on a different memory device so you can recover your PC if something goes wrong.
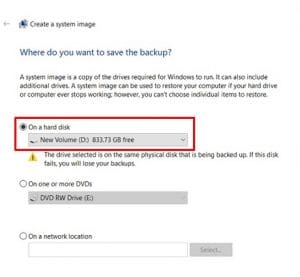
4. Select the extra drives you want to include in the system image next. Then select “Start Backup” from the drop-down menu. That is all there is to it. The backup will begin in the background, and you will be notified when it is completed.
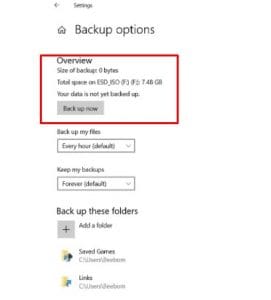
OneDrive can be used to create a backup.
You can use OneDrive to back up all of your crucial files and folders to the cloud. You won’t have to manually install it because it comes pre-installed on Windows 10. Here’s how to use it to automatically sync your files to the cloud.
1. Type OneDrive into the search box after pressing the “Windows” button once. The app will appear at the top of the search results. Select it by clicking on it.
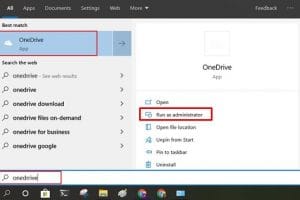
2. Sign in to your Microsoft Account from this page. Create a Microsoft Account if you don’t already have one.

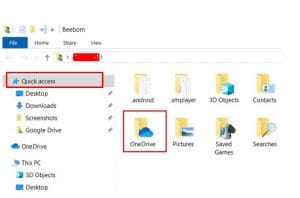
3. Next, go to your “User” folder and look for the OneDrive folder. You can move any file or folder here, and it will be synchronized to OneDrive right away. You may get to the files on the cloud by clicking this link. You’ve completed your task.
Third-Party Software
We’ll learn about some amazing third-party tools in this section that can create comprehensive Windows 10 backups in only a few clicks. We’ll go through two fantastic programs that can produce a whole system image and another that can backup your stuff to the cloud. So, with that out of the way, let’s get started with the first app.
Reflection of Macrium Free
The best approach to clone your hard disk to an external memory device is with Macrium Reflect. It functions similarly to Backup and Restore, but with a lot more customization and options. The best thing is that you can produce a single system image that can be mounted as bootable media on a pen drive or hard disk. In a nutshell, you’ll be able to clone your system to other PCs in a matter of seconds. Let’s walk through the steps now.
1. Get a free copy of Macrium Reflect by clicking here. You can also upgrade to the $69.95 premium edition for more features. The free edition, on the other hand, is quite decent and includes all of the necessary capabilities for a thorough Windows 10 backup.
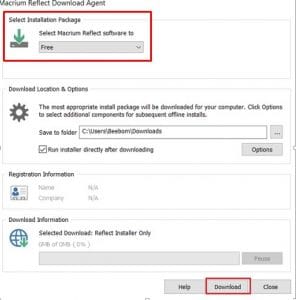
2. Run the installer and you’ll be presented with a number of options. Leave it alone and click the “Download” button. The setup file will be downloaded by the installer. Also, whenever you need to, click “Next.”
3. To continue with the installation, you must register your email address and provide the key.4. Macrium Reflect will launch after the installation is complete. Select the drives you wish to back up here and then click “image this disk.”
4. Next, select a location for the Windows 10 backup image to be saved. Now press the “Next” button.
5. Select the Backup Plan Template from the drop-down menu. It essentially refers to how and when the backup schedule will take place. Choose the best plan, “Differential Backup Set,” and then click the “Next” button.
6. You’ll see a summary of backup drives, rules, and schedules here. After clicking “Finish,” you will be able to backup Windows 10 without any problems.
7. It is advised that the backup file be moved to a separate memory device or that the destination folder be set to a separate portable media. It will save you a lot of time and aggravation if the hardware fails in the future.
8. If you’re replacing a hard disk or relocating to a new computer, I recommend using the “Clone this disk” option. It will copy everything, including the OS and personal files, from the boot partition to the kind of disk. However, cloning your system will necessitate the use of a different hard disk.
9. Macrium Reflect also has a scheduler, backup for specific folders, and system image backup, among other functions. You can look through them to determine the best method for creating a complete Windows 10 backup.
AOMEI Backupper
Another excellent tool for creating a comprehensive Windows 10 backup is AOMEI Backupper. The user-friendly UI of this app is its selling point. If Macrium Reflect is too much for you, AOMEI Backupper is a good alternative. It offers practically all of the functionality, including backup for disks, files, systems, and partitions. Here’s how you can put it to use.
1. Go here to get the free version of AOMEI Backupper. You can upgrade to the professional edition for $49.95 if you require more sophisticated features.
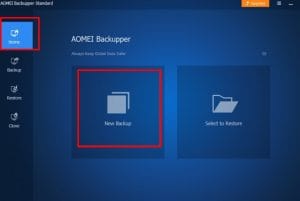
2. Run the software after it has been installed. These two settings can be seen on the home screen. Select “Backup” from the drop-down menu.
3. Select the sort of backup you wish to perform here. Choose “System Backup” and click “Next” to generate a Windows 10 backup that is just for the operating system.
4. Here, select the backup file’s destination folder and click “Start Backup.” The Windows 10 backup image can be stored on a local or external drive.
5. If you only want to backup specific folders, select “File Backup.” Choose “Disk Backup” for a comprehensive hard disk backup. Choose “File Sync” if you wish to automatically backup folders at a certain time. Finally, select “Partition backup” if you want to keep the Master Bootloader with the recovery partition. This will allow you to back up the recovery OS, which is typically found on laptops.
6. That’s how you use the AOMEI Backupper to build a Windows 10 backup image. If you’re replacing a hard disk or upgrading to an SSD, you can also use the “Clone” option.
Take a Windows 10 Backup and Save Yourself from Unforeseen Data Loss.
So that concludes our guide on creating a full Windows 10 backup. As we’ve seen, Windows 10 provides two excellent backup options. When it comes to backing up crucial files and disks, File History can help. If you are concerned that your computer will fail you at some point, you can make a whole system image. It will be beneficial to you in the long term. If you are dissatisfied with the default Windows tools, you can turn to third-party software. Macrium Reflect is a great software with many capabilities that I would suggest. So that’s all we’ve got from us. If you enjoyed this post and would want to contribute your preferred technique for backing up Windows 10, please do so in the comments section below.


