How to Fix Windows Update Error Code 0x8007000d

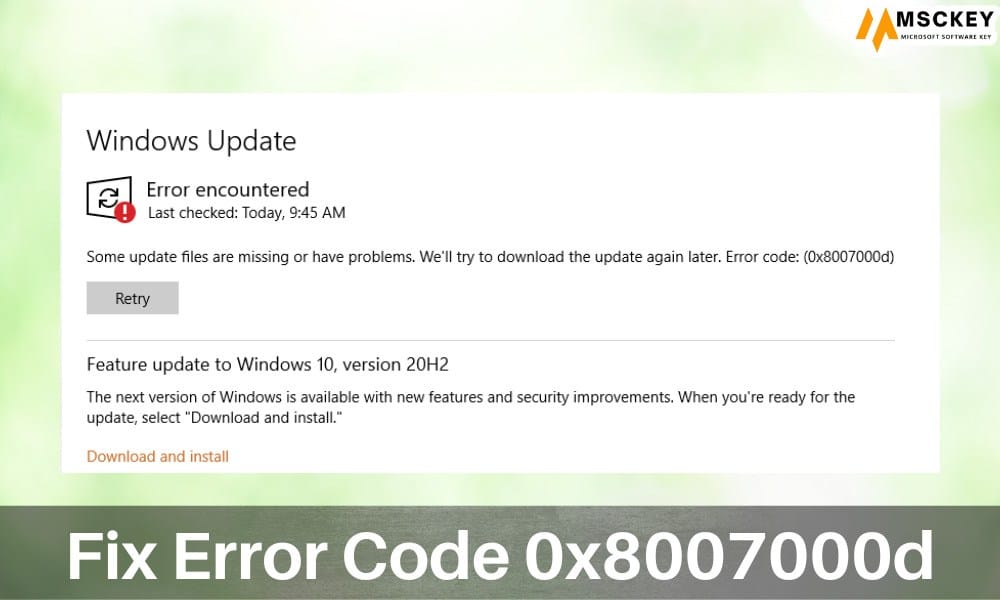
The Windows update error code 0x8007000d appears with an error message that says, ‘Some update files are missing or have problems. We’ll try to download the update again later‘ while the user attempts to install a new update on the device. This common update error code appears on different Windows OS editions. Throughout this guide, we’ll discuss the fixing method for this update error code. But before jumping on the fixing techniques, we should know the reasons behind this error code.
The Reasons for Error Code 0x8007000d
Many reasons can be responsible for triggering this type of update error code on your device. The below-described reasons are considered highly responsible for fueling update error codes on Windows devices. Probably, one of these reasons could trigger the error code 0x8007000d:
Network Issues
Microsoft doesn’t allow the user to update Windows offline. So, it is essential to have a stable network connection while updating Windows. Otherwise, you may face issues, including update errors while updating the Windows OS. If so, you need to ensure that your device’s network connection status is stable.
Malicious Infections
Malicious infections can prevent the user from completing necessary actions, including downloading and installing the Windows update. In this case, a complete security scan can wipe out the malicious infection and resolve the issue of your device.
Missing or Corrupt System Files
The system files control all the system actions of a device, and any problem with the system files may cause different issues. The update error could be triggered for missing or corrupt system files. If this is the scene, repairing the system files could resolve the update errors.
Software Conflicts
Software conflicts can cause severe issues on the device. Some software impedes the actions of other programs and causes software conflicts. It is possible to trigger the network error code on the device. In this case, removing or disabling the third-party applications could help the user to resolve the issue.
The Fixing Methods for Windows Update Error Code 0x8007000d
You’ve now known enough about the reasons that mainly fuel the error code while updating the Windows OS. It’s time to jump into the fixing methods of this error code; the below-described troubleshooting methods could help you to resolve the issue:
Running the Update Troubleshooter
Windows have a dedicated troubleshooting component to diagnose minor issues of the device. Running the update troubleshooter can fix any problems, including the update error code 0x8007000d. You can follow these steps to do so:
- Press the Windows key + I button to open your device’s Settings and navigate to the System > Troubleshoot > Additional Troubleshooter.
- Scroll down through Additional Troubleshooter and find the Windows Update troubleshooter under the Most Frequent list. Press the Run button attached with the Windows Update option to start the troubleshooting process.

- Follow the on-screen instructions to complete the troubleshooting process.
Once completed the troubleshooting process, check if the problem is solved now. If the issue still exists, follow the next method to fix this update error.
Disable or Uninstall Third-party Utilities
Third-party utilities have a notoriety for causing many issues while completing device actions. They can be the driving force for causing software conflicts on the device. Disabling or uninstalling third-party utilities could resolve the problems driven by software conflicts. Following these steps could help you to uninstall third-party utilities:
- Press the Windows key + R key to open the Run Dialog Box, type ‘control panel,’ and press enter to open the Control Panel.
- Navigate to Programs > Programs & Features > Uninstall a Program. Here, you can see the list of all installed programs on your device. Select the programs or applications you want to uninstall and press Uninstall.

- Press’ Yes’ if the system generates any pop-up to continue the installation process.
Check if the update error exists; if you still notice the same problem on your device, follow the next fixing method.
Running SFC and DISM Command
The System File Checker or SFC command verifies the system file integrity, and the DISM command helps to detect and resolve any issue with system files. The following steps could help you to do so:
- Press the Windows key + R key to open the Run Dialog Box, type ‘cmd,’ and press ctrl + shift + enter to open the Command Prompt with administrative access. You must press ‘yes‘ if you notice any user account control pop-up on your device window.
- Execute the sfc /scannow command on the Command Prompt to start checking the system files integrity. It may take 3–5 minutes to complete the execution process.

- Afterward, you must execute the ‘dism /online /cleanup-image /scanhealth’ command on the Command Prompt screen.
- Now, execute the ‘dism /online /cleanup-image /restorehealth’ command on the Command Prompt to complete the process.
After completing the execution process of these commands, check if the issue remains. If the issue remains, follow the next method to fix the problem.
Manual Update
Performing the manual update enables to forceful update of the Windows OS. It’s a backdoor of Windows update. To perform a manual update;
- Surf through this webpage, paste the update’s KB number on the search bar and click enter to see the related updates. (You’ll find the KB number on the update settings page)

- Locate the most appropriate update option according to device specifications. Click on the Download button to start the downloading process.
- Once downloaded, click on it and follow the on-screen instructions to complete the installation process.
If this completes the update process, you are all set. Follow the next troubleshooting methods to resolve the issue.
Edit Local Policy Editor
The local policy editor helps the user to define policies for the different actions of the device. Specifying the installation policy of optional components can resolve the update issue of your device. Here are the steps you should follow to do so;
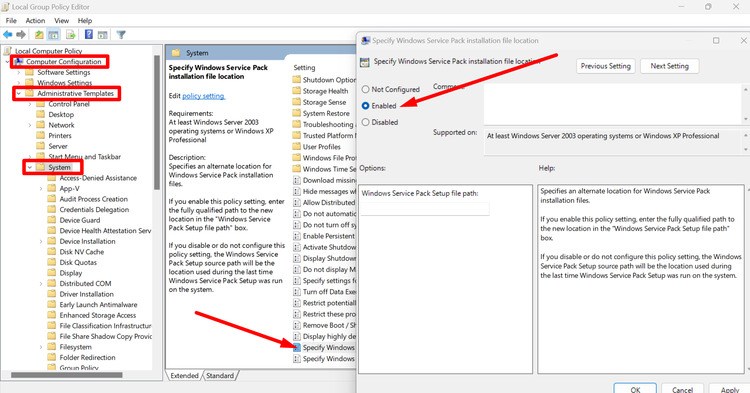
- Press the Windows key + R key to open the Run Dialog Box, type ‘gpedit.msc,’ and press enter to open the Group Policy Editor.
- Navigate through Computer Configuration > Administrative Templates on the Group Policy Editor. Scroll down to find and select the System folder.
- Scroll down on the right pane and find ‘Specify settings for optional component installation and component repair’. Right-click on it and select ‘edit’ from the context menu.

- Now, check the ‘enabled’ option and click on Ok. You are just a restart away from completing the process.
Check if it has resolved the update error; otherwise, you must follow the next troubleshooting methods.
Change the Value in Registry Editor
Changing the registry editor’s value can resolve many device issues. It is possible to determine the update error issue by changing the OS update value of the registry editor. You can do so by below describe steps;
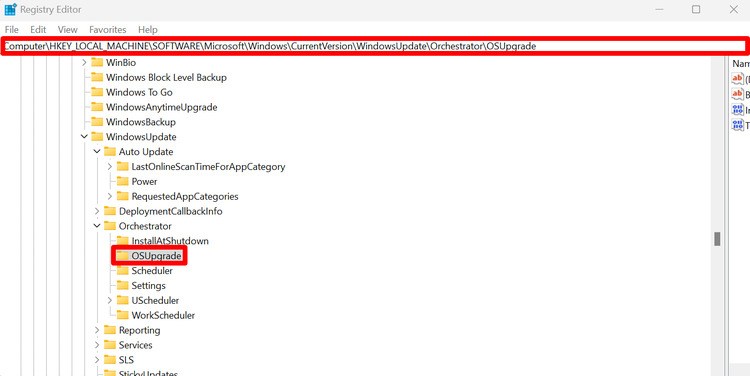
- Press the Windows key + R key to open the Run Dialog Box, type ‘regedit,’ and press enter to open the Registry Editor.
- Navigate through the following path on the registry editor:
Computer\HKEY_LOCAL_MACHINE\SOFTWARE\Microsoft\Windows\CurrentVersion\WindowsUpdate\Orchestrator\OSUpgrade

- Right-click on the OSUpgrade, select DWORD (32-bit) Value and rename it as AllowOSUpgrade.
- Modify the AllowOSUpgrade by right-clicking and selecting Modify. Change the data value to 1 and click Ok.
After completing the modification process, check if the issue has been resolved; you should reset the update components to resolve the issue.
Reset Update Components
Resetting the update components will take the update settings to the default state. It will fix all the issues related to the update. Here are the steps that will help you to reset the Windows update components:
- Open the Run Dialog Box by pressing the Windows key + R button, type ‘cmd,’ and press ctrl + shift + enter to open the Command Prompt with administrative access. Press’ yes‘ if you notice any user account control pop-up on your device window.
- Type the following commands line-by-line and press enter after pasting each line:
net stop bits
net stop wuauserv
net stop appidsvc
net stop cryptsvc
Del “%ALLUSERSPROFILE%\Application Data\Microsoft\Network\Downloader\*.*”
rmdir %systemroot%\SoftwareDistribution /S /Q
rmdir %systemroot%\system32\catroot2 /S /Q
regsvr32.exe /s atl.dll
regsvr32.exe /s urlmon.dll
regsvr32.exe /s mshtml.dll
netsh winsock reset
netsh winsock reset proxy
net start bits
net start wuauserv
net start appidsvc
net start cryptsvc

Reset Update Components will resolve any update-related issues of the device. Though, it could erase the previous updates of the operating system.
Conclusion
We’ve touched the finishing line of our guide for fixing Windows update error code 0x8007000d. Hope, one of the above-described methods has helped you to resolve the issue. The lights are off for today, have a great day.


